I was looking through some old pictures on my computer & I came across some before & afters of the extra bedroom in our old townhome. It was just so interesting to see the progression of the room over the 3 and a half years we lived there. [Warning: these come from my pre-design-obsessed days so please bear with me!!! ;) ] Here is what it looked like when we first moved in. (I painted it white because it was a terrible brown-beige):

It was my office and also the room we cared about least. At the time I was working for my family business (a company that manufactures locomotive components) doing PR. I put the chaise lounge we already had in there and we purchased a little black desk with a hutch on top from Luckett's for around $270. The rest of the things were trash-picked, garage-sale items or thrift store finds that we just sort of would come accross. The mirror below, was given to me by a friend of my grandmother's, an award-winning teen author (
Bebe Faas Rice) and I painted over the blue wood for white. It was inset with black glass. (That now too is painted)

Here's the black desk & hutch we found. I wasn't in love with it but was in dire need of a desk & it was sturdy & I liked the lines (and price!!). I filled it with moss balls (leftover from our wedding) and other accessories to be switched in & out on a whim.

I used 1 iron rod with white panels to save on not having to buy 2 panels & because it also saved space. (The chair seriously KILLS me now but I found it to be taken out for trash & didn't have one so I quickly brought it in & painted it white :) ... I LOVE trash-picking.

After living there for a bit... and not being happy with the room, I decided it was time to actually do something with it. I chose this gray-beige and used blue accents with greenery. It was an odd color-combo but it worked. I loved the jolts of blue and it gave me some place to put the blue items I owned that didn't work anywhere else. I actually found a lot of comfort in the room as it was in this stage. It had an earthy quality & was sunny enough to handle such a thick color.

I used this folding table (below) as an extra workspace for projects. I recovered the seat of the file cabinet bench (ikea) in a blue & white stripe because I was in a serious nautical mood. (Notice the striped pillow on the chaise too--- I couldn't find large enough stripes in a fabric I liked so I cut strips of blue fabric & sewed it together with a natural twill.) I had plans of replacing the handles on the closet door to a nickel but we never got there. :)

Below are some of the blue bottles I'd accumulated. I like pretty little things in window sills in the warmer months. It just reminds me of simpler times for some reason. My grandmother often has a little vase of flowers on the window sill in her kitchen.. maybe that's why???

And here's the chaise lounge with (a much skinnier!!!) Ashby:
Below is one of my mushrooms prints ($1!!) scored from Goodwill. (I lost them over this Christmas when I hid them away to put up my feather wreath & have now forgotten where I stashed them!! arg!!) hahaha I love the white against the walls and also the little glass knobs on the drapery tiebacks.
And finally, when the little addition came to our family, the room was once again transformed. By this time I had my business up and running and had a much clearer vision for the room:
I won't go into much detail about the nursery since I've posted on it before & if you're interested you can
read all about it here. But as you can see, the chaise stayed, as did my striped pillow. I stuck with coastal (STILL not over it ;) and the baby got a ship painting & a porthole mirror.
One thing I want you to check out is the carpeting change. We originially ripped out the old carpeting (it was yuck!!) an attempted to sand down the plywood & stained it with an ebony stain. I know how crazy that sounds but I saw it in a resturant & it totally worked. (And we were really trying not to spend!!!) Well, it didn't work for my house. Our dog is white & the floors never looked clean!!! Anyway, we recarpeted and I LOVE this carpet. (Shaw's "sisal touch" in fawn) It looks very much like sisal but is a fairly soft burber.

Anyway, I just thought it was so interesting (and funny!! :) to see how rooms evolve and how we evolve as decorators/ homeowners. I think it's really important for people to be okay with not having it all completed at once. In the real world we often have tight budgets & can't have it all right away so it's vital that we learn to work with what we've got. It's also important to spend wisely & really get to know yourself and your style before you start spending. Fortunately I didn't have a budget for decorating when I first started out or I could have done some serious damage!! eeeeek
I hope everyone had a great weekend & just a quick update on the house--- they have verbally said they will accept our offer but haven't signed the papers yet. (what is going on?!!)
xoxo,
lauren


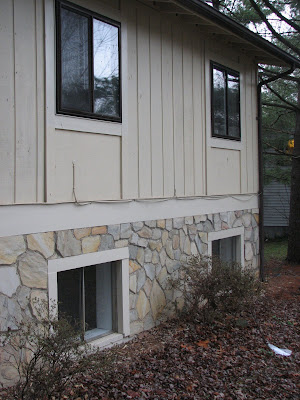
 We'll be painting (haven't decided upon colors yet so I'm up for suggestions) and I'm thinking about pulling out a dark rich gray from the stones and going white with the trim. (Now, you KNOW how much I want a white house- but do you think that would be totally weird with the stone??) My husband is planning on adding a pergola along the front right side sort of as a porch but with a patio underfoot. Basically like what you see below (similar color too! :) but extending along the whole front right side of the house:


 Little container for little toys:
 Four custom tags for under $2:
 Fun little magnets:
 Head over to

 Go to the switch for the light you are changing out and turn it on -- first so you can tell if you get the right breaker and second, it's a real PITA when you've run down a set of stairs, through the house and to the garage, turned off the breaker, run back through the house, up the stairs and then realized YOU HAVE NO CLUE WHICH SWITCH YOU ARE WORKING WITH! Whew.


 The dining room is a necessity!!


