Warning: Turn down the volume unless you are a fan. Lots and lots and LOTS of screaming:
http://www.youtube.com/watch?v=Z7Qth0Rp0Jo
Sniff. I'm so proud!! Oddly enough, she was only up there for 20 seconds or so. It felt like four minutes while we were there. This is a good thing, because it means I was only standing there frozen like a total dweeb for less than a minute. Good stuff.
OK, so let's move on. The long awaited squares and stripes post, which works well for this time of year (stars and stripes...get it??). It's really not rocket science, and yet again, there will collective "DUH." when you're done reading, but I like to share so I'm sharing. OK? OK.
 First, the squares. The two items you must have for squares and stripes is a level (either the one below or a laser level that sends a beam of light straight down the wall) and blue painters tape. For this wall, I used two inch painters tape for the whole wall. I used the white wall as the background, but if you want a color, you'll need to paint it that color first.
 Then, the measurements all depend on the size of squares that you want, or how many rows/columns you want. Say your wall is 127 inches -- and you want six columns of squares. You'll subtract two inches for each end of the wall, and each two inch space between each column -- basically each spot the painters tape will go.
Do the same for the rows up and down as well. I know I made this seem complicated and it's really not that bad. It may take you a few tries to get the right measurements -- it did me. The rest is easy, it just takes time.
 I hope that made sense! After you've figured out your measurements, you'll just need to measure off your wall. I use a yard stick, with the measurement marked, and I keep moving it down the wall, marking, say, 19.16 inches up and down the wall. Then take the level and use it to make straight lines on the wall vertically and horizontally.
Take your blue painters tape and run it along the lines. You can use the laser level and put the paint along the laser line, (this is how I do it) or you can put a light pencil line down the wall and then tape that off. To make sure no paint bleeds under the tape, I've heard many tricks, but all I do is take my thumbnail and run it down each side of the tape. You can also use a credit card or pan scraper. It works every time for me.
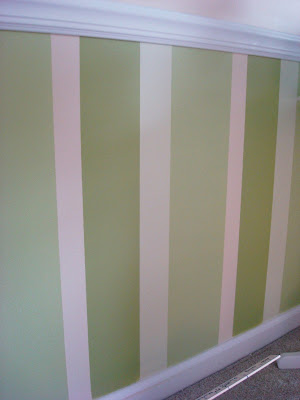
For stripes, my little trick is to use the yard stick again. In our son's room, I wanted the stripes in different widths -- two, seven, three and five inches. I did all the painting before the chair rail was put up, so the top of the stripes doesn't have to be perfect. Before I started, I marked the measurements and colors on my yard stick, and then used the painter's tape to hang the yard stick on the wall:


 Using the marks on the yard stick, I used the level and painters tape to put the stripes down the wall. With stripes, you can't do all of them at once. My wall was cream, so that stripe was done. I had to paint three other colors, so I did the dark and medium green first, let it dry (I did NOT wait as long as they recommend and you don't need to) and did a quick second coat. Then I pulled off the tape and the next day did the third, lightest green by reapplying painters tape on each side of that stripe and painting:
 Of course, the more colors, the longer it takes. It seems complicated and again, it's not. The great thing about varying stripes is you don't have to measure the wall like with squares. Just figure out what look you want and go. Once you get going, it will go surprisingly fast. Surprisingly. Swear. Pinky swear.
I taped off most of the stripes in my son's room within a couple hours, and the total paint time was probably a few hours.
I did stripes on one wall in our bedroom as well:
 This was done by just painting the wall the base color, then taping off one foot columns and painting a shimmer glaze over the base. It's a really subtle look and I absolutely love it.
My biggest tip when using painters tape -- take the tape off when the paint is still damp if at all possible!! I've heard from professionals to keep it on till the paint is dry, but when I've done that, it makes a mess. The lines turn out awful, because the tape pulls up little pieces of the paint. When it's damp the tape comes right off, leaving a clean line.
If you have any other tips for a clean line or painting stripes/squares, please leave them in the comments! I know many of you have textured walls and I know it can be done, I've just never tried it. ;) I appreciate any other thoughts!!
It takes some patience, but the result is so custom and beautiful, you won't regret it!
P.S. I went to the best antiques shop in Indiana today and whoooeee, I have some eye candy for you later this week!! If you follow me on Twitter, you have already seen some of them. Fabulous!!!


 My and my BFF. We've been best friends for about 23 years. Five NK's concerts together, and I wouldn't want to go with anyone else:


 Images with flash end up being dark & cold & cheap-looking. (above & below)
 Now, check out the "after" (below). It's light & airy and much better:
.jpg) 2) Shoot during the day when the lighting is good. (Unless you're specifically after nighttime shots like a Christmas tree at night or candles or something special like a city view.) Here is our living room when we first moved in. (With all of my lovely decor from my old apartment... eeeeeek) I didn't use flash on it even though it was taken at night: (which is good)
2) Shoot during the day when the lighting is good. (Unless you're specifically after nighttime shots like a Christmas tree at night or candles or something special like a city view.) Here is our living room when we first moved in. (With all of my lovely decor from my old apartment... eeeeeek) I didn't use flash on it even though it was taken at night: (which is good) But check out the difference in the same room during the day: (no flash of course)


 Styling for the kitchen: Sometimes people actually go too sterile when photographing kitchens. But, remember you can ditch items like your toaster (if it's not cute & takes up too much space), sponges, pot scrubbers, pens & pencils, etc. Consider having a pretty soap dish or dispenser, nice towels, good-looking cooking utensil holder, a bowl of fruit and/ or vase of flowers.

 Show personal, but not-too-personal-items that make the space look lived in: NOT the box of tissues but maybe a cool glass of water in a vintage glass or a pair of glasses on a stack of pretty books..
 Pottery Barn is awesome at styling in my opinion. I might not always be in love with what they're selling but I'm always so impressed with their styling. (above) For dining rooms, make sure there's something beautiful on the table. It doesn't necessarily have to be a set table (which does look gorgeous) but it could be something simple like a pair of lanterns or dinnerware stacked up as if it's about to be set with a little vase of fresh flowers.


 Jen at


 Richella (just say that...lovely name) at
  June used


 See?! I told you you could do these. Easy peasy! Have a great weekend!
 To begin with, let me tell you that I was aware that a home should have flow with colors & a tone that relates to one another throughout the rooms, but I totally disregarded this because I knew I would only be living there for a short time & I wanted to go crazy with colors, to experiment. And experiment I did...

 We painted the kitchen in a terra cotta and (here's where it gets bad) the dining room in BLUE. hahaha oh well... talk about flow! The rooms were fairly closed off from one another but from one point in the entryway, if you looked just right you could see all 3 colors at once. I kid you not, I kind of loved it & would stand there to see all 3 colors at once, telling my roommate, "Oh look! If you stand here it's like a rainbow!!!" hahahahaha

 We also knocked over an entire gallon of paint on the white carpet and had to rip it out to expose the hardwood parquet underneath. Now, this was an apartment and when this happened, I did not expect to get my deposit back, but they did give it back!! WOW love them!

 When I painted the bedroom & bathroom a pale blue & got the Bombay bed, I would say it was at this point that I started getting a sense of what was "me." I repainted my bathroom a pale blue to match the pretty toile shower curtain I got from Restoration Hardware at a wedding shower. (below)


